
This past week I spent a couple of days in London with a friend. Just a brief visit, but we had a lovely time. It was my first time in the city for a few years – I used to go up there two or three times a year when I was a kid, because we had relatives there, but over the past 5-10 years the visits have been much more sporadic. Hopefully I’ll actually be living there soon (crosses fingers), so it was also a preliminary visit to re-familiarise myself with the area and see what it was like getting around the place.
One of the major advantages I have now, compared to many years ago, is the fact that I have a smartphone. And I certainly made good use of a few particular apps, both before and during my time there. I should say that I’m not affiliated or connected with these apps or their developers in any way, I just wanted to mention the apps that I was using. I don’t know if any of these apps are accessible with Voiceover either, as I can see well enough not to have to use it. And if you know of any better apps that you feel I should check out after reading this, feel free to let me know.
Firstly, I used Google Street View to check out the area I was staying in before I got there, to remind myself of a few of the shortcuts and routes I was going to use. Standard flat maps are good to a point, but I find it really helpful to be able to walk the streets and see what they look like before I’ve even got there. Even if the street imagery isn’t bang up to date, there’s still enough information there for me to get a good sense of where I’m going, and I can keep trying different routes if need be to see what might be easiest.
I find it particularly useful for picking up on landmarks and street features for later reference. For instance, I can’t see street names unless I stop on a street corner and try to find the street sign, often using my monocular (a mini telescope) to read it at a distance, especially if it’s high up on a wall somewhere. And yes, it’s also possible to use, say Apple Maps or Google Maps to direct me when I’m walking the route. However, if I already know in advance that there’s a big pub on the corner, or a distinctive road layout, or a big tree, or something else that’s unique that I can see at or before the junction, then I can continue walking without having to stop, as I already feel confident about where I’m going.
Street View goes even further than that though, because it can even take you inside certain buildings – including train stations. I didn’t know this last week, so I was very pleasantly surprised to discover that I could walk around Paddington and London Bridge mainline stations before I went to them. Granted, half of London Bridge station is now closed off for Thameslink development work, so Street View is only useful to a limited degree, but it was still nice to get a general feel for the place before going. And while we’re on the subject, Doctor Who fans mustn’t forget the Tardis outside Earls Court station. The box is actually there on the street in real life, as it was installed as part of a safety project in 1996. But on Street View you can actually walk through the doors and look around the Tardis interior. It’s pretty cool!
While in London, I also used a couple of other apps to check out where I was going. The first is Citymapper, which has all sorts of useful features. Firstly, it has maps of the Underground and streets, which you can zoom in on very closely for easy reading. Far easier than fiddling around with paper maps. It also works out the best methods to get from one place to another using the Tubes, buses, etc, presenting the information clearly with very accurate times and distances. I believe it will even alert you during a journey as you reach certain points, though I didn’t try this out.

It even takes into account service disruptions when planning routes, which is really useful, and allows you to monitor Transport for London’s various Twitter feeds in one place. And it has a sense of humour, as scrolling down can sometimes reveal an option for a jetpack or teleportation! So that app was extremely handy. I can see myself using it a lot when I’m in the city again in future.
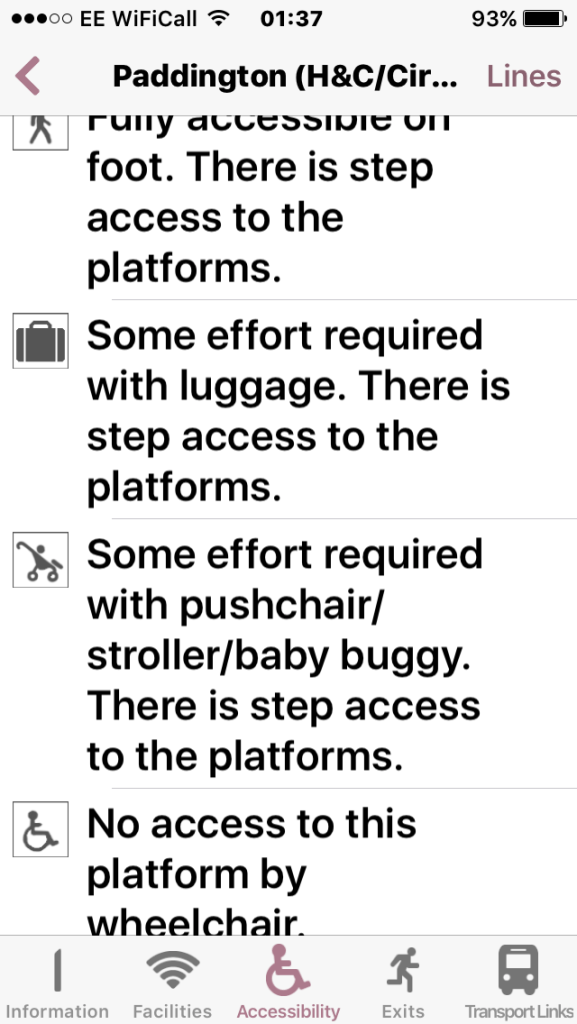
To find out more about specific stations, meanwhile, I used Station Master, which tells you all sorts of useful information about all of the different stations on the underground. It also uses the enlarged text setting on my phone, which is brilliant. It goes into a lot of detail about the accessibility of each station, including whether there are stairs and lifts and wheelchairs, even saying how many steps there are in many cases. Plus it tells you how many ticket gates there are, including wider ones, and details of all the other facilities at the station (WiFi, ticket machines, cash machines, payphones, and loads more)
It also tells you what carriage to be on so that you’re nearest the station exit when you get off, which can shave off a fair amount of walking given how long some platforms are. And there are also details of the transport links available from each station, 3D maps of each station, 2D maps of each station’s location, and general fun and historical facts about each station. So it’s full of all sorts of useful bits and pieces.
Finally, I will also briefly note the Trainline app, which I used to book my journey to London in the first place. It allows you to access your ticket information and see where and when your train is stopping, right down to the platform number and taking account of any delays, so that was useful too.
Certainly having a smartphone makes getting around such a big city very much easier than it may otherwise be. But I didn’t need to use my phone when I was actually on the Underground itself, as I can thankfully see the signage well enough, even if I have to pause every so often and use my monocular for the ones hanging down from the ceiling. Sometimes I don’t need to read them at all of course – either because it’s a station I know well already, or because it’s sufficient just to follow everyone else when there’s only one way out anyway. But when I do need to use the signs, I’m able to find them and use them easily. I do find the font and the colour contrast very clear to read.
For many people of course, it’s not that simple, I know that. If you’re not familiar with London and the Tube, then it can be very overwhelming and confusing, and it certainly isn’t a city for everyone. It does take some getting used to without a doubt. But once you do get the hang of it and have travelled around there regularly, it can work very nicely.
The signs on the Tube are a case in point (assuming you can see them of course). They work very well for many people, because they’re very carefully and deliberately designed according to strict standards. For example, at every ‘decision point’ or junction, you’re only told what you need to know at that point. So in the ticket hall, you’re told what lines run at the station, so you can decide whether to enter or not to begin with. Then there will be signs directing you to each specific line (and if you’re walking down long or multiple corridors, the signs will repeat themselves to reassure you). And it’s only when you get near the platforms that you choose the direction of travel (east, west, north or south).
It all sounds obvious, but a lot more thought goes into all the signage on London’s transport network than you might realise, including their positions, fonts, sizes, colours, etc.The signage design for the Underground follows a strict specification, which covers everything you could possibly think of and more.
The only aspect where the signs let me down last week were for the lifts. I wouldn’t normally need to use them anyway, but as I was guiding my friend around with his big suitcase, it was much easier to use the lifts than the stairs, as you can appreciate. But it was often quite difficult to find the lifts in the first place, as it was never obvious where they are. We ended up asking a member of staff or another member of the public where the nearest lift was.
Also, on both the inside and outside of the lifts we used, the buttons are recessed into the lift’s metal wall, and are the same colour as that metal wall. So trying to see where the buttons are and which one to press, when they’re practically invisible to me from a relatively short distance, was quite hard sometimes. So much so that on one occasion I ended up pressing the alarm by accident instead, as it was the only button my eyes found to begin with. Luckily we didn’t get in trouble, as the staff realised we’d hit the wrong thing, but it was still a bit embarrassing. On the plus side, though, I do like the fact that some lifts have a little animated display by buttons, showing where the lift is and if it’s coming towards you. And there was at least one lift that talks to you – not that it’s necessary for just one floor, but still, it’s a nice touch.
Speech is a standard feature on most, if not all, Tube trains of course. Sometimes it’s clearer than others, depending on how quiet the speakers are and how loud the train is, but having announcements about which line the train is for, where it terminates, what station is coming up next, what lines you can change for at that station, and even what’s available when you exit the station, are all really useful. I already knew that the RNIB were based at King’s Cross St Pancras, but I didn’t realise that the Guide Dogs Association were at the next stop (Euston Square), so that was something new I learnt this week.
There are visual signs on some of the trains as well, again better on some lines than others. I liked the Hammersmith & City line trains I used this week, for example, where the lit-up sign showing the terminating station isn’t just on the very front of the train (where I usually don’t have time to read it), but was also repeated above the windows on the side of the train at regular intervals. And inside the trains on that line are clear, scrolling text displays with information. So I found those quite good, and I imagine they’re even more useful for those who can’t hear the audio announcements at all.
I found the ticket machines easy enough to use as well, as I could read the touch screen quite well when I was leaning in close to it. I had been worried that it might be difficult, so I was pleasantly surprised that they worked. I was using them so I could buy a ticket for my blind friend, mind you – I already have an Oyster Card, having bought one a few years ago, so for me it was simple getting through the barriers anyway. I do like the fact that those big yellow Oyster pads are so easy to see, it’s really helpful. I do have my card set up online to automatically top-up when necessary, but hopefully I can get a Freedom Pass (for free travel, as I’m eligible due to my disability) once I become an actual resident of the city in the future.
So all in all, I was very happy getting around London on the Tube, and it was easy to guide my friend around as well. The apps I had were useful for planning routes, the signage in the stations made it easy to get around, and we had no trouble working out what stations to go to or how to change from one train to another. It was all pretty smooth.
And I’m very much looking forward to being able to explore London a lot more in the hopefully not-too-distant future, especially as I’m confident I can get around the place quite easily and confidently. The novelty of living there may wear off after a while I guess, but there’s so much to see, do, learn and enjoy there, so I can’t see myself getting bored!


One thought on “Underground, Overground, Rambling Free”